Sunday, March 24, 2013

#1 teacher pop n cuts - clever me edition

 
Don't you just love the pop n cuts dress form and framelits? Soo many possibilities. And here's another one.


Now I didn't draw on her face, I just couldnt get it to look right. But doesn't she almost look real?
 I still have to figure out her shoes though....hmmm.


Saturday, March 2, 2013

Who said masculine cards were hard?

I was one of those people...but its really quite the simple process when you think about it.
No glitter or pretties, manly images & basic colours-browns, blue, black and white. I don't think you can really go wrong?!
 
The Open Sea


                                                                     By the Tide

                                                                        Need for speed

                                                                  Need for speed


Tuesday, February 12, 2013

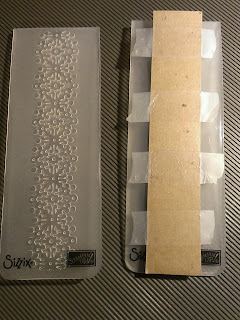
Delicate designs folder background

Get more out of your border folders by repeating across the card, lining up the edges as you go.
You want to start at the right edge and work your way back across the card.
Rolling through with the fold of the folder going through first.
However there is a little trick to them let me show you.
 
 
This is my first run through. I found that as I was moving across, the flat space in front of the design was pushing the previous embossing flat again. See how it is only slightly raised?
Still leaves a pretty impression, but not quite what I was after.


So this is my second attempt and look how beautiful it turned out! So how did I do it?
 
 
I used a diy "shim"out of cardstock which I used to cover the design only, creating more pressure where I wanted it. You will have to play a little bit to see what works with your embossing machine. I omited one of my plates and used 2 tan embossing matts which was the right thickness for me.
If it's too thick don't force it.
 
Mix it up, move your folders into each impression for different looks or use more than one folder.
Happy Embossing :)


Saturday, February 2, 2013

More Amore Valentine

The new Stampin up seasonal catalogue is now live with some sweet new products for Valentine's Day which is only 12 days away.
 
The laser cut heart is actually part of a sheet of 16 hearts which you could leave whole as a scrapbook page (see post below) or divide them for many uses. The sheet is one of two that comes in the pack of double sided More Amore DSP.   
 
 
Products:
Heart punch
Heart framelits
Pretty in Pink cardstock
More Amore DSP
Riding Hood Red pleated satin ribbon (not currently available)
snail, dimensionals, sticky strip
score pal (envelope)


Sunday, January 13, 2013

New products sneek peek

Ooh, the moment I saw the new products from the upcoming catalogue on February 1st I knew they would be perfect for my wedding photos. And not only did I get three projects from the one kit, I still have more leftover.


So this scrapbook page is the first in a long time, and as soon as I saw the Artisian kit and More Amore DSP, this was exactly how I wanted to use it. The paper & embellishments are gorgeous!
This is my favourite photo of our wedding in November.


The next card was inspired by Deena Boos. I loved her's but wanted to glam it up a bit by embossing the background and using whisper white ribbon (retired). I also used whisper white c/s instead.
 
 
And casing Julie Marshall, I changed the colours added a greeting and some ribbon (it really went a long way), and its hard to see but I paper pierced around each of the hearts.


Saturday, January 5, 2013

Hiatus

Hi all, I'm still here sorry for the looong hiatus. Really time does fly. Lots of things happening (weddings, work & christmas to name a few), and not enough time to do it all. Including my long time neglected blog. Will be back soon with lots of inspiring and pretty cards so stay tuned!

Saturday, August 25, 2012

Paper wedding bouquet

So I'd bought my latex flower bouquets a while ago. I wanted something that was going to last long after the wedding. I was quite happy with them, until I stumbled onto Leigha Rock's stunning paper flower bouquet. I'd spent enough on them, and I still did like them, but I wanted her creation as well.

So I carefully pulled one of the bouquets apart, followed Leigha's tutorial and this is what I came up with:

                                                                                                               before

                 This is one of the bridesmaids bouquets-isn't it just gorgeous!                                               

Now if you don't have the same products Leigha used, don't worry-just improvise. I substituted some punches for the die she used, with the same great result. Before you get started I would recommend preparing all your pieces before assembly so you can make many at once.

Leigha has since made many more stunning bouquets for your crafting pleasure, check them out in her side bar-you won't be disappointed!

                                                                                         
Related Posts Plugin for WordPress, Blogger...